Tinker Around

Welcome to my blog. It is full of basic projects and tutorials for things that I have done and feel like others out there would benefit from learning too. Be sure to take time to leave me a comment. Thanx, Pam
Showing posts with label storage. Show all posts

Saturday, January 18, 2014

Sewing Area... and Painting and Scrapbooking

I decided that the "studio" was just getting out of control.  So, I began the overhaul, it was just that bad.  We have been bringing in stuff from my dad's that was mom's work room.  It was ok to start with ... but then a box here, a box there.  Memo to self, put stuff up when you bring it in and if there isn't a place for it... then don't bring it in the house to start with.

Below, is a picture of my very first sewing area, the machines had to go below the pop-up tables.  Just goes to show, that we can do something with a space and then upgrade as we can afford it.


http://tinkartist.blogspot.com/2012/09/making-large-work-space.html   This link will show you how to make your own table out of a sheet of plywood from Home Depot.  This is the most reasonable priced way of doing things that I have found.  Please feel free to share your room in my comments!  The picture below is how I had the table this last time.  But, the supplies were all in a bookcase across the room and the serger machine was kept in the closet.  Just too time consuming to get to what I needed for a project, so I just didn't use the space for anything but a junk surface.

Also... that file cabinet to the left (below) is covered with woodgrain sticky back paper now too.  My fabrics are in those cabinets hung by type on file folders.  That is also shown in my blog.  Keeps fabrics clean and no fading from the sun, plus they are at your fingertips with just a pull of the drawer!


The next picture show how the room looks now.  I must say, it is very workable now.  Everything right there where I can get to it!  The over-sized mat for cutting is standing at the end of the table with my tabletop ironing board.  


I hope you like how I labeled everything for you and that maybe something here will help you in your sewing space.  Click the picture and it will be larger and easier to read all my notes and labeling.

A friend asked me this week if we ever get to where we stop changing things in our "work spaces".  I told her that I didn't thinks so.  It is the nesting trait that we have as women. So... don't forget to check back often to see the next part as it is revealed, or just follow and it should let you know when I update the blog.  There will be at least three parts to this room makeover.

So... hope to see you soon, as I am excited about this and want to get it finished up pretty quickly.  Next entry will be the painting area in the room. -Pam


HEY!!!!!!!!!!  I AM BACK!!!!!!!!!!!!!   I am finding it easier to just add the pictures of the rest of the room here, instead of starting another new post.  So...


Below is the left and right sides of this painting area.


This next picture is moving on around.  The new work space is really deep.  I used a 2x4x10 to make the legs for shelves.  Then, the top shelf is hung with the $2 brackets that are all wood and sold at Home Depot.  The entire new scrapbooking work area was made with one sheet of plywood and the (2) 2x4x10s.  I am loving all the space!


All the magazine boxes are decorated with the type stickers that are in each one.


Had to find a way to keep the Sizzix right at hand!


There is a plate with an old clock pulled apart that is a project.  All sorts of fun stuff.  But, it is all organized now.  Hope you have enjoyed!

See ya soon!!! -Pam

Thursday, April 28, 2011

Paint Bottle Rack

Well, I told you that I had designed a rack to hold my bottles of craft paints, well....I got it!!!  SO excited!!  I have already sold four of these and my carpenter is a very happy man.  These are just raw wood, so you can paint or stain or whatever.  Here is a picture of how I used to store my paints...
They were organized by brand and then by color. But, what a mess to try to get to them.  I have stored them in the past on lazy susans, spice racks, tubs, shelving,... Nothing seemed to keep them compact and easy to get to.  So, I got with my carpenter, who is priced very reasonable!  And what you see below is what we ended up with.
This is a picture of just one of the units, I bought two to start with.  Each unit holds 80 bottles of the crafting paints, mine are mostly Folk Art with some American.  I just find that those brands are the thicker ones and I get great coverage.  


You can see in this photo that there is also a carved handle in the top in case you want to move them around, lift and go.  (above photo)


Now in these two photos (above) you can see the front and side views.  I designed it with a slant to each shelf so that the paints are laying forward and the paint comes out a lot better, and I don't have to do as much shaking!


In this picture you can see my two units stacked.  I left a few blank spots in each color area for expansion. See that tub at he bottom?  Yeppers, I still have more paints.  I have ordered one more unit that is just 40 bottles to hold my gems, glitter, and metallic paints.  It will stack on the top and I can still comfortably reach all the yummy rows of paints!!!  How neat is this?  What do you think??  

You have questions??  Oh, the measurements and how do you get one??  Ok, for one unit... $30 plus tax   I know that companies change prices over the months and years, so just know that this is the current price when I am doing this posting, you will need to contact them and see what the going rate is when you are going through my archives and find this posting.  The unit is 4 1/2 inches deep (it might fit behind a door for you!), 29 1/8 inches tall (it might fit under your desk), and just 21 inches across.  It is a nice size to hold so many bottles of paints, we wanted compact as a must in the design!!!  Where do you order yours??  Uncle Bob's Workshop www.unclebobsworkshop.com   214-534-9975    He is out of Garland, TX  so if you are shipping, you might as well pay the shipping for a couple of them!   You can email Bob at unclebobsworkshop@verizon.net  I think that you could have one of these made to hold your spices too!  He can also make them larger if you want, I personally like this size.  The one that I am ordering to hold the remainder bottles of paints would work great for a tabletop display of your paints.  

Ok, I didn't post last week, did anyone even notice??  Any comments to this weeks posting??  Would love to hear from you.  See ya in a week or two. - Pam


Wednesday, March 2, 2011

My Art/Craft/Sewing/Scrapbook Room

Well, are you ready?  I am excited that my old room has new floor and a fresh coat of paint.  While I was moving things around, I just went through everything!  I think that I took out two trash bags of "stuff".  And it was trash, I even let my students have first look at some of it.  This is gonna take a while, so if you are hungry or thirsty, just stop right now and go get it and come right back.

Ok, let's start with a couple of before pictures.  Dirty carpet that was walking itself across the floor, and I was afraid that I was gonna have a student (or myself!) trip and get hurt.  The walls were ok, but they were starting to look worn.  I had used flat paint when I put up the purple, this time I used a satin.

Now I have changed my mind.  I am thinking that it might be better to show you each wall before and after together, explaining as I go about the changes made.
Notice the purple curtains, garland of flowers up at the ceiling, and the diplomas and certificates on the left side of the window?  Take a look below...

Ok, yes, the purple is all gone!  See the new placement of the certificates and diplomas across the top of the room, and the flowers are all gone.  A much cleaner look.  There is a sheet of paper to the left of the window, and that is where the paint unit is going to go.  I have a carpenter that builds things to my specs at reasonable prices.  I will post it when it comes in and also add his web address.


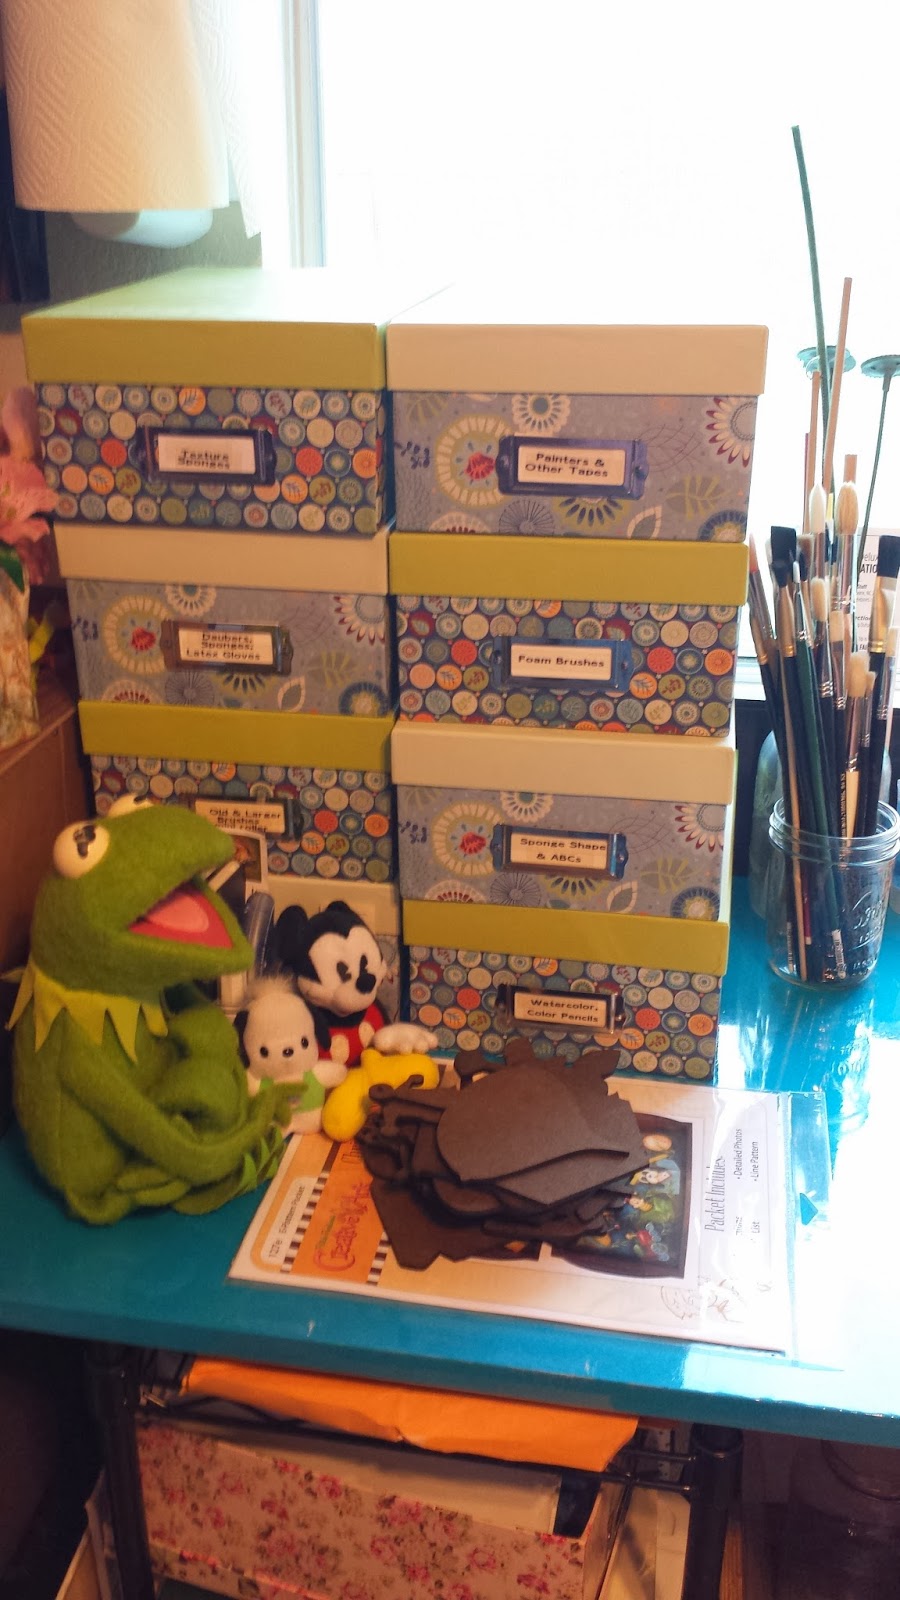
This is the wall to the left of the window.  In the corner is a rolling cart with my Sizzix dies, rubber stamps, and other supplies.  The bookcase has tubs with paints the acrylics and other paints.  The next bookcase is full of all my reference materials, and the top shelf is altered art books.
Here is the first section of the transformation.  I moved over a small unit to house my KopyCake, and rolled the other unit into the closet.  Then, I added a few photo boxes to organize painting supplies - extra brushes, craft paint rollers, my Genesis paints, faux sponges,...  Towards the top you will that I am displaying all the fun little things that I have painted.  The very top is used to store tall brushes, crochet thread and a few more photo file boxes.  Now, let's look at the next bookcase...
Again, the very top and top shelf is for display items.  All the altered art books got moved to the closet.  Everything else is still basically the same.  Let's take a peak behind the door, though we already saw that in a prior post.
I love, Love, LOVE how I am storing my canvas flat behind the door.  They no longer get dents, they are up off the floor, and I can see at a glance how many I have or what I need.  Oh, look down at where the wall and floor meet, see the baseboard?  I faux finished that to match the door, the floor was too light to have cream baseboards.  I have the how to on this and the floor on a prior blog posting.

Let's take a look at the next wall, this one is across from the window as we are wrapping around the room.  By the way, this room is approximately 14' (the window and door walls) by 10' (the bookcase walls).
This is the wall where I would hang all my artwork for upcoming classes, and there is my radio/CD player on the floor under the table.  I was able to move the radio/CD player to a shelf in a bookcase, much more accessible.  There is a spot for my sewing machine to sit when I need to sew.  Yes, that is a roll of paper towels on the wall, they got moved over to the window wall by the tables where they are used.  Aprons are hanging on the hook on the wall, and now I just keep one apron hung on the door.  Let's see the after picture.
I put up a frame that I padded and covered with some retro sewing fabric that I got at Ruby Jane's Retro Fabric.  She ships and you can see all her fun stuff at http://www.rubyjane.com/   She has a fantastic little quilt shop and is very helpful when you need something special!!!   Tell her that Pam from Garland sent you.
Then, look to the right of that, see the two picture frames, those are paper dolls that I played with when I was little.  Connie Francis and Annette Funicello were always my favorite, and I just chose a few of the prettiest outfits to display and stored the others away safely.  The two baskets are just supplies that are available for my students to purchase extra supplies.  I stored my two tabletop ironing boards behind one desk, and my rotary cutter on the wall behind the other one.   

Remember the top part of this wall had assorted art hung that was to be taught in future classes, or that I was just showing my students that I had done?  Don't these shelves look much neater, and I used my mini nail gun to attach a thin board across the front so that the art work wouldn't slide off.   At least I can move them around and not continue to add more and more holes to the walls, that should make my husband happy.

Let's move on to the last wall, it is full and looks busy...but it works for me.


Let's start with the two bookcases on the left.  The top and top shelves are all full of more photo storage boxes.  The ones on the top are all craft stuff, yessssss... there is a LOT.  The next row of boxes are all in tan and black, those are for altered art, glues, tapes,...    There are also two hardware boxes with lots of little drawers, and those are full of pre-cut alphabets and are written about in a prior post.
Then next row is actually white magazine boxes from IKEA, 5 for $1.99 and they are full of organized by theme/subject sticker.  I saw this done somewhere, wish I could remember who to give the credit to.  (Before picture doesn't really show a lot, but the stickers were all in baggies and clipped on a rod and there were lots of things just laying around.)
Under that is all the brown and black boxes that are for scrapbooking and the Cricut machine.  The bottom shelves are for scrapbooking paper, sheets of chipboard/cardboard, and extra sleeves for my pages.

Take a breath and lets go to the middle section of shelves, it is from a large wall unit, one of the side towers.   On top there is a box of yarn, the next two shelves are my Sizzix dies, and the next is a spot for my machine.  I just treated myself to the new electric one, I was still using the old red dinosaur.  A lot of my art tapes are still on DVD so I have a player and then there is a small tv at the bottom.  (The KopyCake overhead used to be in this unit and you saw it got moved to the wall to the left of the window.)
Last bookcase!  Black and white photo boxes are full of needlepoint, cross stitch, silk ribbon embroidery, needle tatting, knitting needles and crochet hooks.   There is a sewing machine in a cream colored cover towards the middle.  Then, all that other stuff is neatly folded fabric!  My cone thread and serger are all in the closet on the back wall on a shelf and in spool racks. 

You can read about the rest of the room in my past blogs.  All in all, I am please with the way the room turned out!  One of the best moves I made was to get all like things together in the same area.  Now, all the painting is together, same goes for the sewing and the scrapbooking.  Saving steps and staying organized means saving time.

  I think I will still come back in later and put some words on the wall.  Maybe something that Sharron has told me for years, "Enjoy the Journey."  Another friend, Regina, always says "It isn't that crucial!"  Maybe just something like "Create".  I don't know yet, and thus, I haven't put anything up yet.

The tile looks like real ceramic tiles, was less than a dollar each and I was able to install it myself. Please let me know what you like about my room and if you decide to use any of my ideas.  I love hearing from my readers, and I do get quite a few emails.  Please try to put your comments here, I know other folks would also enjoy ready what you have to say.   Next week...dunno yet, but I do look forward to it!  -Pam

Thursday, January 6, 2011

Gaining Storage and Decorating that old Luggage

Well, I said that this would be an informative blog, so let's get started on recycling that old hard sided suitcase that you found in the attic when you were putting up all the Christmas decorations.  This really is a quite simple thing to do, and makes the luggage almost like added furniture depending on how you use it.

Any luggage can be stacked and used as an end table as long as you have it securely stacked and the heavier pieces are on the bottom.  They can also be used as separates to hold dog toys and clothes, your yarn crafts, or just to store away seasonal blankets.  It is up to you what you want to put in them, I just decorate them.

First of all, let's talk about the different kinds of luggage and how it is put together.

Any luggage or suitcase that is made of fabric gets painted on, though you could do some sort of needlework on it.  Silk ribbon embroidery would look nice.  IF I am painting on a fabric suitcase, also known as soft sided luggage, then my choice of paints would be the Fabric Paints that are put out by Plaid.  They stay soft, not rubbery like an iron on, and you can barely feel where the paint is at all.  Really enjoy using this paint!!


There are two kinds of hard sided luggage.  There is the kind where the sides and front are smooth, the surface wraps around and leaves nice crisp curvatures.  Then, there are the ones that have gathers at the curves.  Now, let's talk about the later one first, the one with the gathers.  These are difficult to cover and therefore, I usually just paint them, like in the photo above.  Secondly, there were the ones that we mentioned with all the smooth curves.   These are great to cover with old book pages, fabrics, sheet music, anything that you can put  onto it with glue.  Yes, glue.  I use the cheapest, most inexpensive school glue that I can find.

Let's back up just a bit.  A project can only be as good as the prep that goes into it, so let's talk about prep.  Clean that old luggage up.  Take some rubbing alcohol to it, or any of your favorite household cleaners and get off everything that you can.  You are not worried about accidentally taking any of the color off or anything at this point, you are gonna cover the whole thing anyway, you just want it smooth.  Now, I hope you are one of those folks that gets those disposable foam brushes when they are on sale, we are gonna use a few.  First of all, pour a good amount of the glue out onto some sort of old throwaway lid or styrofoam plate.  Use the foam brush to put a thin coat of glue over about 1/4th of the suitcase, lay your paper over that and use a brayer to roll over it and get all the air bubbles out, then take and put another coat of the glue over the top.  Yes, my nice brayer is now nasty with dried glue and I will have quite the time getting it all off.  Now, 1/8th of your project is finished, 1/4th if you are only doing one side.  Repeat this project until the entire case has been done.  Let it dry for at least a day, it looks so good, don't rush it.

Did you wait?  Ok, take it out to the garage where there is plenty of ventilation and take some of those foam brushes with you.  Open your favorite can of sealer, mine is a glossy polyurethane.  You could use a spray, but it isn't good for our environment and it just doesn't go near as far.  Take your time and do this right, it is better to do two or three thin coats and not have to worry about drips and globs.  Do one side and let it dry for the amount of time it calls for on your can, then repeat.  After the first side is finished, do it all over again on the second side.  Do not think that sixteen coats of poly will protect your suitcase even more.  After about two or three coats it will start to cloud up, once it is clouded you will have a matte finish.  Once it is clouded there is not really anything that I know of that you can do about it.  IF someone has an answer for unclouding the over sealed item, please post it below under comments!

In this photo, The one in the back is the gathered edges and was a really learning process.  Learning that those are easier to just paint and go on.  
The Dick and Jane in the front, that is the one I like to cover.


So now I ask you, which suitcase do you wanna tackle first??  These are so much fun and so useful.  I sell them every year at craft shows and people are just so full of ideas as what to do with them.  I even have one that I did up for a train collection and it is on wheels.  Go for it!  Have fun with these and if you start early, you will have them all done up for gifts for your friends for birthdays and other holidays!  Be sure to send me pictures of the ones you do.

See you in a week, oh, what are we going to discuss??  How about if I show you a project that I did on my bedroom wall.  Lettering is not a hard thing to do at all, and it makes quite the statement!