Tinker Around

Welcome to my blog. It is full of basic projects and tutorials for things that I have done and feel like others out there would benefit from learning too. Be sure to take time to leave me a comment. Thanx, Pam

Wednesday, January 26, 2011

Thrift Store Hymnal turned Cookbook

If you were with us last week, then you remember that I was going to show you my Cook Book.
Ok, here we go.  This is a picture of my $2 hymnal turned cookbook from one of the many flee market/thrift stores that I visit each year.


I will mainly be showing a lot of pictures, I don't think you need too many instructions.  You will need to figure out what tabs you want for your categories.  My thickest part of the book will be for my desserts, that is what I enjoy baking the most.  As you can see, I still need to do the labeling part.  Also, the book will get fat if you pile in too many really thick embellishments without allowing extra pockets for the depth.  We will talk about sinking them down into the pages in the next paragraph.


There are a few places where the 3D stickers or embellishments are really thick.  I simply figured out how many pages it would take to get the depth and cut out a square that the embellishment could sink into.   It is kinda like one of those books that has a hidden compartment inside, except that we went ahead and filled that spot.


You could also add pictures of what the dish is supposed to look like, or a picture of who you got the recipe from.  Be creative and have fun with it.  Be sure the title page is altered to reflect who it belongs to or will passed down to.


I keep mine out on the kitchen counter.  It is a great conversation piece to have around.


Here are a few more pictures.  Be sure to start shopping for food and baking stickers right away if you are going to make something like this for the kitchen.  Sales are the best time to purchase and you can get more and stash them away for when you need them.  I now have plenty!!!  lol.


You could also use an old hymnal for a scrapbook, this would be a great gift for your music minister from the choir.  I also tear out pages and paint on them and then sell them at shows, folks can put them in a floating frame that shows the frayed edges of time worn favorites.  I would not suggest you tear up a hymnal in good shape, be sure to use one of the older ones that is already falling apart, they frame up nicely.  Lots of churches are getting away from the old hymnals and you can find them fairly easy.

So, get out there and start creating!  Be sure and add yourself as a follower.  Next week we will take a look at some organizational tips, as I am really doing some deep cleaning in my art/craft room.  Have a great week and I will see ya later, Pam

Thursday, January 20, 2011

Faux Finishes

Today's post will be all about taking shortcuts in our painting.  Why spend hours making layer upon layer of paint when you could just do a faux finish in a whole lot less time and money?  So, there are gonna be lots of pictures, and for each finish I will just list the tools and the paint colors that I used.  The paints for these finishes are by Folk Art, that brand is the thickest of all the brand of crafting paints and therefore goes much further.  All these are my practice boards so to speak, and are done on canvas sheets.  I keep them for reference to show clients for backgrounds.  Here we go!!!

Some rules that apply to these finishes...Completely drying something means that it can't be cool to the touch, because that means that it is still wet down under the top skin of paint.  Walk away, let it dry!  When you go on to a second step in a process, work fairly quickly as you don't want it to start drying while you are still trying to work with the paints.  When working with sponges, be sure to wet it first and then wring it out real well, maybe even giving it a good squeeze with a cloth towel.  Try to pick up liquid off a counter with a dry sponge...now try again with a sponge that has been wet and then wrung out.  Amazing how much better and more efficient a dampened sponge works!


First.  Woodgrain.
Basecoat with Butter Pecan, and let it dry completely.  Next is a mix of two parts of glazing medium (from the craft store is fine) with one part of Burnt Sienna.  Paint over the entire surface with the mix.  Use your woodgraining tool (can get one at the hardware store or online) and pull through the paint while slowly rocking it to obtain the look you want.  Because this mix had the glazing medium in it, you have some time to work with it.  IF you don't like your first attempt, just repaint it with the paint that is already on the surface and try again.  Let your rows overlap just slightly.  Let it dry.


Second.  Kinda looks like faux leather, depending on what colors you use.
Basecoat with Yellow Ochre, and let it dry completely.  Make a mix of glazing medium and Burnt Sienna, equal parts of both.  Work quickly and paint over the surface, lay a plastic shopping bag (writing on the INSIDE!) down over the top.  Squish it around, leaving wrinkles all over.  Peel it off and there you go.  Don't like it?  Just redo it real quick.  Let it dry.


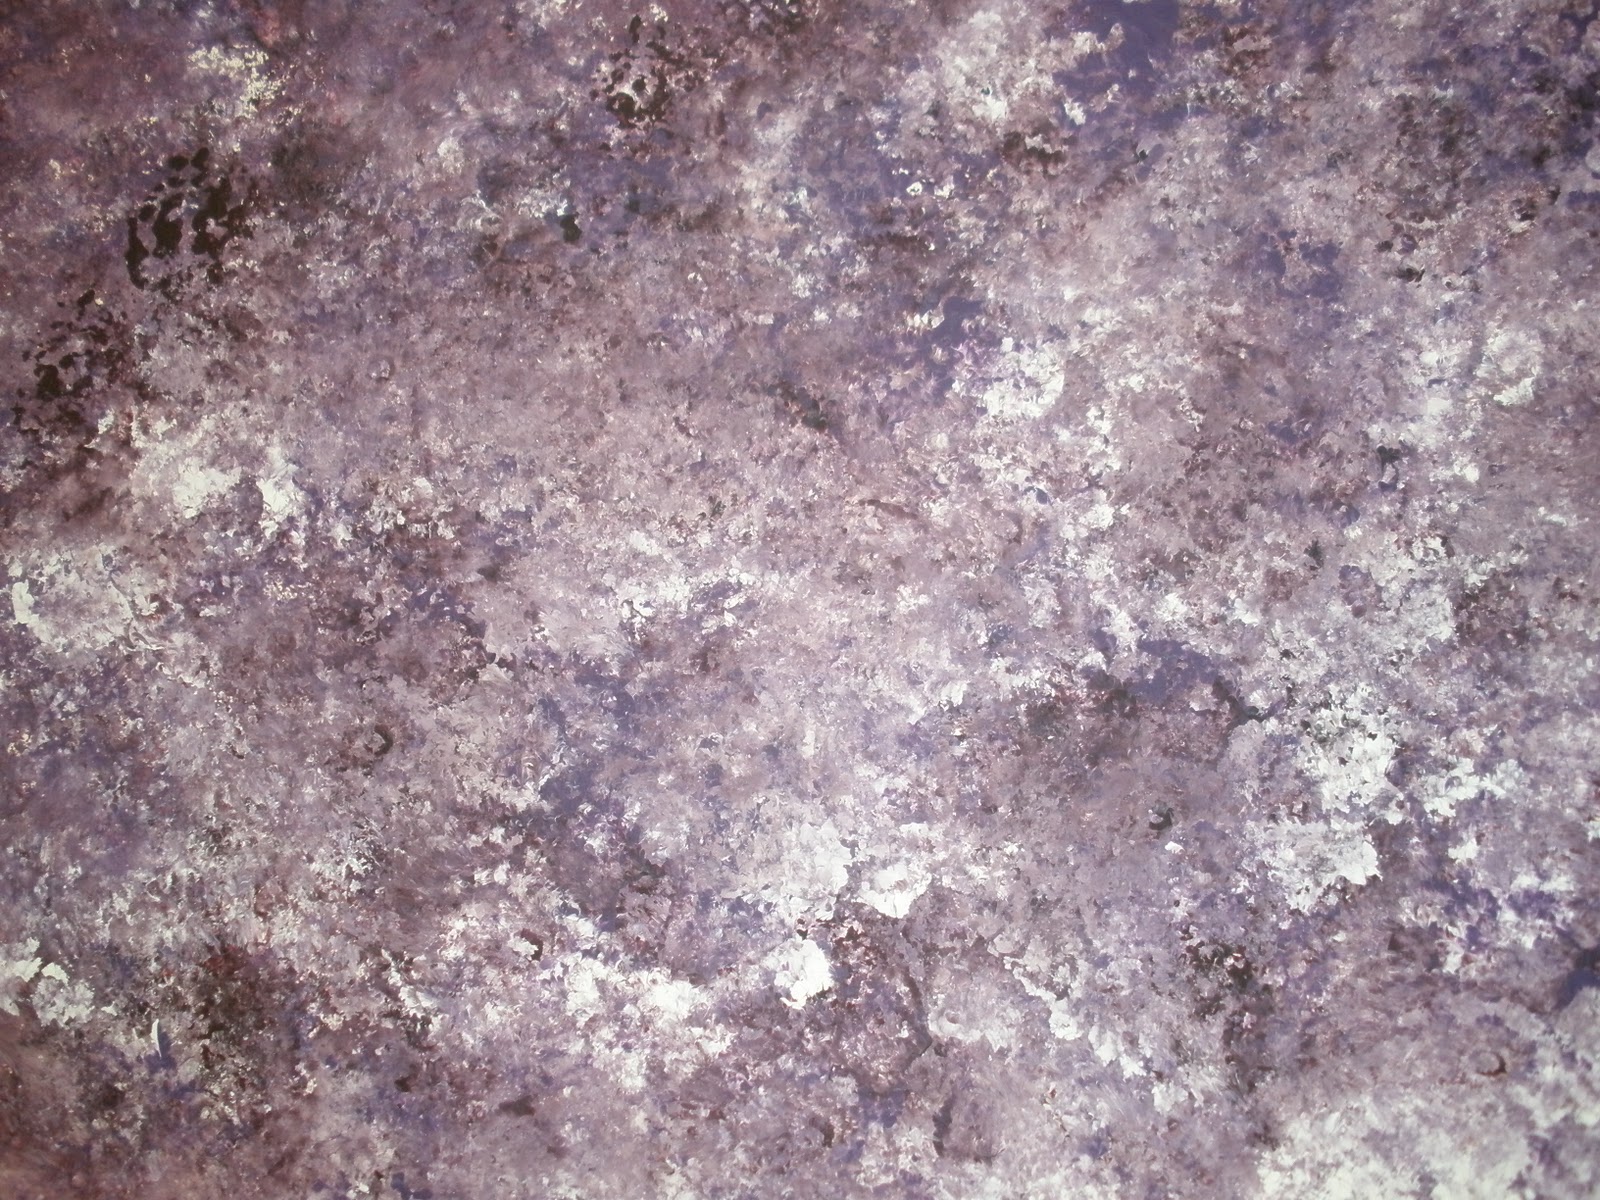
Third.  Damp Sponge Background.
Here is where you use one of those sea sponges with all the holes in it, be sure to dampen and wring out.  On a throw away recycled lid, put out Burnt Carmine, Violet Pansy, and Wicker White.  Pick up some of each color and apply all over and repeat until your surface is covered.  IF you need more open time to work, add just a bit of glazing medium with each color before you start.  Rotate the sponge as you are pressing it down so that you don't get all the holes in the same places all the time.  I have used the technique quite a bit when doing memory boxes for area hospitals.  You can make a really soft pastel background to paint little baby things on.


Fourth.  Damp Sponge Marble.
This is done like above as far as using a sponge, but it looks more like a marble due to the colors used.  Basecoat in Burnt Umber, and let it dry.  Now use water and thin the paint down a bit, it isn't going to be quite one to one.  You don't want your paint runny, but you want it thinner than it comes out of the bottle.  Colors that I used are- Burnt Sienna, Raw Sienna, Butter Pecan, Metallic Inca Gold, and Burnt Umber.  Use your Sea Sponge and work while it is wet with all the different colors til you get the look you want.


Fifth.  Denim.
Basecoat in Navy Blue, and let it dry.  Second layer is a mix of glazing medium and a touch of true blue.  Put this mix on very quickly with one of those inexpensive foam brushes and then with a VERY light touch drag a dry wallpaper brush through it to leave streaks.  You can come back in and add any orangy colored stitch lines you want to after it is totally dry.  You can also float a line of the color next to the stitching to make it look more like a raised seam.


Sixth.  Linen.
Basecoat with Butter Pecan, and let it dry.  Mix of 1/2 glaze medium and a little French Vanilla and coat the canvas.  Quickly while it is wet, drag the dry wallpaper brush across it to leave fine lines.  Let it dry.  Repeat the mix and drag process again going the opposite direction.  Let it dry.  Nice background for lettering signs.


Seventh.  Crosshatching.
You are going to use a 3/4" flat brush for this one.  Wet the brush and dry it on a paper towel.  Put Teal and Extender all around the outside using small "x" motion with your brush.  Inside that comes the same technique with Cayman Blue and Extender, be sure to blend in with the first area.  The last color is Wicker White and Extender in the center, blending with the colors used before.  Can't tell you have many times I have used this for a background on many a surface!!!  You can use any two or three shades and just go from dark to light, blending in little crosshatching "x" strokes as you go.  Because of the extender, you can play with this for a while, but don't drag out the process.  Love, Love, Love this technique!!!


Eighth.  Diagonal.
Is done with a 3/4" flat brush and worked one color right after the other while it is still wet.  You do one color and then do the next one and blend to create a color in between.  Colors used are- Burnt Umber, Raw Sienna, Terra Cotta, and Linen.  Keep using the same dirty brush through the entire process and don't overwork it.  Let it dry.  I have done quite a few angels on this background after changing the colors to various shades of blues and white.


Ninth.  Crackle.
Really like putting a crackle on the background before doing something that is gonna be shabby-girly, antique or country.  Basecoated with Bayberry, and let dry.  This is really quite simple and I used the kit put out by Plaid called Crackle Coat Kit.  Do the Undercoat in ALL ONE direction.  Let it dry for about 30 minutes or until it is just tacky to the touch, no wet puddles!  Then, going in ONE direction I put on a coat of Linen.  DO NOT RESTROKE you work, it will start pulling up and moving around on you and you will end up with a mess.  Trust me on this one.  The less strokes, the better the results.  Now, sit back and watch it crackle, too cool!

I encourage you to just get some old scraps of canvas or wood and try these out.  Change up the colors and see what different effects you can get.  Always remember, it is only paint.  You can almost always sand it all off and start over!!!  Enjoy these techniques and see how you can use them to change up your furniture, walls and decorative painting surfaces.  Be sure a let me know what you think, leave me a comment.  Are you using one of these techniques to revamp something??  I would love to hear about it!!

Be sure and check back in with me next week when I tell you what I use my Flee Market Hymnal for.  Happy painting and go do something creative.  - Pam

Thursday, January 13, 2011

Writing on the Wall

Well, you should know by now that I am not posting anything that is really difficult.

IF you have an overhead the lettering will be super simple, just print out what you want, and paint it up there.  Not everyone is so fortunate enough to have one.  I will try to simplify the process so that even the most beginner of beginners can feel confident enough to do their own walls.

Supplies that you will need: nice flat or round brush for lettering (depends on letters as to which you will need), yard stick or retractable tape measure, plum line marker (or chalk line marker), blue painters tape, chalk (just like what you would use on a chalkboard is fine), pencil or pen, paper, a computer is helpful but not a must, and some patience.

Go to the computer and see type out whatever saying it is that you envision on your wall, set it to center it on the page.  This way, when you go to print...everything should be spaced out evenly for you if you are doing multiple lines or verse.  Before you click that print button on the computer, there are some questions that you really need to ask yourself.  Hopefully you already know where on the wall you want this painted.  But - How formal is the room?  Are there high ceilings?  Is the room dark or light??  These questions all have to be answered, remember on a past project when I said that the project only turns out as good as your prep.

Let's take the questions one by one.  How formal is the room?  We need this information to pick our font.  If you are doing a playroom, then something like Bradly Hand or Curlz might be nice, or even a very basic Kindergarten alphabet.  A playroom can be done playful, fun, whimsical, and then decorated accordingly.  Again, in keeping with that theme, what colors are in the room?  Do you really want to take the time to do something that won't grow with the room and is so primary that you have to redo it in a year or two?  Just things to consider.   If that room is already dark, maybe you need to paint a band of color around the room to put the lettering on.  If the room is formal, you could even paint it in gold or a regal rich color that is used somewhere in the room for decorating.  Oh, we missed the height of the walls... IF they are vaulted and the room is huge, you don't want to do little six inch letters eleven feet off the ground.  You would have to be on top of them to read and then get neck strain.  Would it look good to come down a foot or two if the ceilings are high?  If it is a dining room, think about doing the letters about five inches or so and putting them at chair rail height.  Just things to consider before you get started, and the process will be a whole lot easier.

The process.  Find the center of the wall you want your lettering on, mark it with a small piece of tape.  Go print out your words on the computer and do it actual size, this will make it SO much easier!  Take your chalk and mark the bottom line of where you want your letter to sit, measure how far that is from the ceiling down.  (The reason that you measure from the ceiling down is because walls are seldom really squared, so don't measure from the floor up.)  Now, mark across the wall every three feet or so at that same measurement.  Take your chalk plum tool and pop a straight line to do your writing on.  Some folks are fine to just start at the first of the sentence and start painting, you don't have to be that daring.  IF you need to put the painters tape on the chalk line so that you can see it better and feel more confident, then do it now.  Take your papers from the printer and tape them up under the taped line so that you know exactly where each letter goes.  No guess work here, you see it, and you paint it.  Now, you should already know what color paint you want to use, and I just use that craft paint from the craft store.  Which brush?  Are you doing calligraphy or a letter that looks like it was done on a typewriter?  Then use your flat to get those flat sharp edges.  Doing something more free and whimsy, then use the round brush.  What size brush?  Well, I don't know what size your letters are, so you are going to have to experiment a bit at this point.  But, you can practice on paper, so don't back out now!  Look at the fattest part of the letter, your brush has to be able to do that large of a line.  Also, look at the thinnest part of the letter...you might need more than one brush.  Practice on paper!

When I do a wall, I work from the inside out.  Yes, working backwards from the center to the left, and forward from the center to the right.  This will help to ensure that it turns out even.  IF you are going around the room, BE SURE that you are not breaking up a word at the corner.  There should always be a space at the corner, it is just more pleasing to the eye and a lot easier for you to paint for the first time.

Ok, go do your painting.  Don't use your money on vinyl letters that stick on the wall when you can do it yourself!  It is so much more fun to tell people that you did that project yourself and that you would be more than happy to teach them how to do it too.  Be sure to share your "writing on the wall" experience with our readers.  Did I leave anything out??  Please feel free to post questions and comments.

I am posting a photo of what I did in my bedroom.  
Whatever the language, it is still "love".  I even did a big sign language hand.    

Here is the mock up that was done on the computer so that I had a road map of sorts to follow.
Hope to see you here sometime next week for my next posting.  Oh, what?  Oh, you want to know what we will be covering?  It is a secret.   See ya later.  - Pam

Thursday, January 6, 2011

Gaining Storage and Decorating that old Luggage

Well, I said that this would be an informative blog, so let's get started on recycling that old hard sided suitcase that you found in the attic when you were putting up all the Christmas decorations.  This really is a quite simple thing to do, and makes the luggage almost like added furniture depending on how you use it.

Any luggage can be stacked and used as an end table as long as you have it securely stacked and the heavier pieces are on the bottom.  They can also be used as separates to hold dog toys and clothes, your yarn crafts, or just to store away seasonal blankets.  It is up to you what you want to put in them, I just decorate them.

First of all, let's talk about the different kinds of luggage and how it is put together.

Any luggage or suitcase that is made of fabric gets painted on, though you could do some sort of needlework on it.  Silk ribbon embroidery would look nice.  IF I am painting on a fabric suitcase, also known as soft sided luggage, then my choice of paints would be the Fabric Paints that are put out by Plaid.  They stay soft, not rubbery like an iron on, and you can barely feel where the paint is at all.  Really enjoy using this paint!!


There are two kinds of hard sided luggage.  There is the kind where the sides and front are smooth, the surface wraps around and leaves nice crisp curvatures.  Then, there are the ones that have gathers at the curves.  Now, let's talk about the later one first, the one with the gathers.  These are difficult to cover and therefore, I usually just paint them, like in the photo above.  Secondly, there were the ones that we mentioned with all the smooth curves.   These are great to cover with old book pages, fabrics, sheet music, anything that you can put  onto it with glue.  Yes, glue.  I use the cheapest, most inexpensive school glue that I can find.

Let's back up just a bit.  A project can only be as good as the prep that goes into it, so let's talk about prep.  Clean that old luggage up.  Take some rubbing alcohol to it, or any of your favorite household cleaners and get off everything that you can.  You are not worried about accidentally taking any of the color off or anything at this point, you are gonna cover the whole thing anyway, you just want it smooth.  Now, I hope you are one of those folks that gets those disposable foam brushes when they are on sale, we are gonna use a few.  First of all, pour a good amount of the glue out onto some sort of old throwaway lid or styrofoam plate.  Use the foam brush to put a thin coat of glue over about 1/4th of the suitcase, lay your paper over that and use a brayer to roll over it and get all the air bubbles out, then take and put another coat of the glue over the top.  Yes, my nice brayer is now nasty with dried glue and I will have quite the time getting it all off.  Now, 1/8th of your project is finished, 1/4th if you are only doing one side.  Repeat this project until the entire case has been done.  Let it dry for at least a day, it looks so good, don't rush it.

Did you wait?  Ok, take it out to the garage where there is plenty of ventilation and take some of those foam brushes with you.  Open your favorite can of sealer, mine is a glossy polyurethane.  You could use a spray, but it isn't good for our environment and it just doesn't go near as far.  Take your time and do this right, it is better to do two or three thin coats and not have to worry about drips and globs.  Do one side and let it dry for the amount of time it calls for on your can, then repeat.  After the first side is finished, do it all over again on the second side.  Do not think that sixteen coats of poly will protect your suitcase even more.  After about two or three coats it will start to cloud up, once it is clouded you will have a matte finish.  Once it is clouded there is not really anything that I know of that you can do about it.  IF someone has an answer for unclouding the over sealed item, please post it below under comments!

In this photo, The one in the back is the gathered edges and was a really learning process.  Learning that those are easier to just paint and go on.  
The Dick and Jane in the front, that is the one I like to cover.


So now I ask you, which suitcase do you wanna tackle first??  These are so much fun and so useful.  I sell them every year at craft shows and people are just so full of ideas as what to do with them.  I even have one that I did up for a train collection and it is on wheels.  Go for it!  Have fun with these and if you start early, you will have them all done up for gifts for your friends for birthdays and other holidays!  Be sure to send me pictures of the ones you do.

See you in a week, oh, what are we going to discuss??  How about if I show you a project that I did on my bedroom wall.  Lettering is not a hard thing to do at all, and it makes quite the statement!