Tinker Around

Welcome to my blog. It is full of basic projects and tutorials for things that I have done and feel like others out there would benefit from learning too. Be sure to take time to leave me a comment. Thanx, Pam

Friday, December 16, 2011

Dry Brushing Technique

Today I would like to just walk you through the process of how I paint on metal and do dry brushing.  There are a few folks I know that just cringe when they know I am going to paint on an old silver plated tray or other item. Then, there are those that do it all the time and wonder why they were not doing it sooner.  So..if you cringe, just hang in there and see the difference that a bit of paint can make and see if you feel the same.  Let me start by saying that I have a source that I go to and if an item really is worth something, I do NOT paint on it.

This is my latest thrift store find, it does have quite a bit of wear and tear damage, but I just loved the lines and the raised design on it.


When I want to paint a metal object...first, give it a good wipe down with a baby wipe and dry it off really well.  Secondly, I take it out to the garage and give it a couple light coats of Rustoleum Primer, two light coats are better than one heavy.  Walk away and let it dry overnight, just seals best when you wait.  Then, I take whatever color I want my item basecoated in and put on a couple thin coats.  In this case, I used Black Plum by Americana for my basecoat color.  While we are on color, I am also using Folk Art Aqua and Americana Titanium White (I could have used any brand for the white).


The next part will be all about the process to get the look that I want for this particular piece.  I get a really stiff brush (this one is Papillion by Artist Club and I got it online from their website) to do my dry brushing.  The brush is stiff, almost like a stenciling brush but with rounded edges, and you do NOT dip it into water before you use it.  I fill my brush with the first color, Aqua, and really work it into the brush.  Then, take it and swirl it into a circular motion on a clean paper towel and get most of the paint off.  Yes, that is what I said, take most of the paint back off.  You have to do it this way to get a nice even coat when dry brushing.   You can always add more paint, you can't take it back off.  Now, I go to the piece and start lightly, very lightly (you can get harder as you run out of color) go in a small circular motion and go over the high parts of the piece.  Now, I went ahead and went over the entire outside of this piece, it just depends on each piece as to how much I do.  As your brush gets really dry and you are not getting any paint off, go back and do the process all over again with the Aqua.


Look at all that gorgeous detail that just pops with the Teal on it!!!  I hope that yo are starting to understand why I paint silver plated stuff that really is not worth much at all.  Now, the next thing I did, was to mix a bit of white to the teal, just to come up a little lighter.  Do the entire process like you did with the Teal.  


Then, I am going to take that mix that I just used and add some white to it, and do the entire process again.  Be sure that you are letting the paint dry between each coat.


Now, I like the results that I have and will find a place for it next to my tray.  


When looking at the piece now, I really don't like the way that the base came out.  I think that I might go back in and dry brush the base with some of the Black Plum.  Then, I am going to do some of the same style stroke work that is on the tray on the inside of this piece too.  Anyway, isn't it all pretty!!!  Now, do you see why I paint on pieces that have a lot of detail?  Oh, the tray in the back was $1 at a garage sale, and the little sugar bowl was $7 at a thrift store.  Who would have thought!!!

See ya in a couple of weeks.  Hope that you all have a very blessed Christmas!!!


Thursday, December 1, 2011

From Carpet to Tile

Today, I would like to show you what I have been doing in my new dining room with the floors.  This will be almost a review of a past post, but I think that you will find it useful.  Let me begin by saying that if I were a couple years older, I would not be doing this...at fifty, my body is beginning to feel the aftereffects of some of the activities that I do from day to day.


This is what my dining room looked like before, not bad, but you also are not seeing the carpet up close!


Ripping up the carpet in strips and what did I find underneath but linoleum.  So, I got to yank that up too!  Of course they had nails holding it down. so that meant more nails to pull up and more holes to fill later.


And, the backing from the old floor was glued down, so I had to peel it up.


I have blogged before about this Dawn Power Dissolver, and here I am using it again.  Water soaking the paper backing was just not doing the trick.  But spray this Dawn and wait five minutes, came right up.  Then, I just had to wet mop the chemical up.


That mess in the center, is all the backing paper that I got off the floor.  Into the trash can it goes!  Oh, let me insert a comment here real quick... Put ALL the tack strips and nails into a trash bag and then into your trash can.  If the city dumps that can and some lose nail falls out, you know it is YOUR tire that it will find.  Save yourself some time and money and just trash bag everything.  Now, my city does a front pick up every week, so the carpet and pad all went out there.  Ok, let's keep going.


See all those little white dots on the front left of the photo?  That is where they had nails before, so they had to be filled.


Failure to fill ALL holes means that your new flooring can dip down into those areas and crack over time.  Again, save yourself some time and money and just fill them now.
 They are filled, sanded, and then the entire floor gets another wet mopping to get everything up!  Then, before I lay each tile, I brush the area off with my hand.  Be sure to lotion your hands later, the brushing over the concrete will dry them out.  Oh, just to let you know, I am doing the same peel and stick tiles that I did in the art room a few months ago.  This room and that room do meet up and it makes a nice flow now.  I still have a small hall and the kitchen to go, and then it will all be finished and look much larger!!!


I bought these to go on the bottom of the table legs and the bottoms of the chair legs.  The package on the right is just some peel and stick pads, and that works fine for the table.  Those pads are not so great for chairs, they start to slide around and fall off over time.  I like the ones on the left for chairs, just hammer them in and they are fabric bottoms.  Everything now glides across the floor instead of scraping! 


Doesn't that table look small on my new floor?  Love it!!!!  And the rooms just flow together with the floors all matching.  Spills are so much easier than with that old carpet.


I have to say that I am very pleased with the results!  I am keeping an extra case of these tiles in case I should have to replace tiles down the road.  One case for three rooms and a hall should be enough.  I started with 21 cases, so I think I better get off here and go get the hall done.  See ya in a couple of weeks!!!


Friday, November 18, 2011

From Booster to Mini Booster

This weeks blog is dedicated to my sister, Patti, who started doing these when her grand-babies were born...what a great idea!  You know how I love to show you pictures, so get ready...cause here we go!

This is what a booster pillow looks like, they used to be on the old day beds...back in the day!
Here is a view from the end.  They usually had pipping and a zipper down the bottom.
Here is a naked booster pillow.  Easy so far, right?
This is me marking a line down the center, and then cutting with a serrated edged knife on that line.


Still with me??  Ok, good.  Now, go to your fabric stash and see what you want to use.  You will need 3/4yd.
Owls are still a hot topic this year, so that is the one I chose.  You want a quilters weight or heavier fabric, unless you plan to wrap it in muslin first.  It just holds the shape and wear a lot better if the fabric is a better weight.

Now, you start rolling the fabric around the pillow.  Another thing to look at is - which way does the design go?  It is best to NOT have a one way print.  One where it is splattered all over is best, these owls just barely fit that criteria.  But, they did work.  You can see here that I wrapped it around, folded under the edge and pinned it across the bottom.  I will go back and do a slip stitch later and take out the pins.


Make sure that you are pulling that fabric pretty taut.  You don't want it walking its way around the pillow or bunching up at the ends.  Speaking of ends, let's do those next!


It is a lot like wrapping a package, and you do the front to back piece last...being sure to fold under the raw edges.  Hope I have not lost you, if you have questions....please post them down under the comment area.  Now for the other end.


Now I have all the hand stitching to do, and that is just a basic slip stitch!  Hope you enjoyed this tutorial.  I love making these and sell them for $15 each.  Here is a picture of some others I have made.
So...now you know how to get from large booster to a mini booster. In the picture below, it looks like I didn't cut it in half...it is just the angle of the picture.  I guess you could do some small small ones and cut it into thirds.

These are great for kids to drag around as chairs, pillows to lay on, how about the adult that sleeps with the legs or knees elevated!!!  I am sure that you can think of all sorts of uses.  Let me know what you think, leave a comment below.  And I hope to be back on in a couple of weeks.  See ya!!!


Wednesday, October 26, 2011

Tips and Stuff in General

Ok, this week...I would just like to share some tips that I have been sharing at shows.  I was surprised that folks had not heard of some of these, so I am sharing them here.  Feel free to post any other tips under the comments at the bottom of this blog.

Are you noticing that your dishes are coming clean but looking a bit milky?  There have been so many changes in the past few years in dish detergents and some of the cleaning chemicals are being left out.  A great cure for this is something called Lemi Shine.


I was at WalMart one day looking for this product that I had heard of and met a lady there getting Finish and Lemi Shine.  She taught me how to fill the cups in the dishwasher to get nice clear glasses again.   I fill the pre wash with just one of the little cubes, and then only fill the main wash about half full.  Close the door on the solutions, close the dishwasher and run just like you always have in the past.


Now, see the glass on the left, that is what the glasses looked like in the past...before Lemi Shine.  The one on the right is afterwards!  What a difference!!!  I had to dig to the back of the cabinet to find one that still looked so poorly.  You know...I think I need to be sure that they all get through the dishwasher with the Lemi.  


Next up.  There is a fabulous product that I keep under the sink for quick access on almost any surface imaginable.  I have used this on carpet and clothes to get paint out, on an old pot that had burnt on the stove, stains on the counter top, on my plastic water basins that get covered in paint,...  In fact, I do not know of anything that I have not used it on!  Just follow the directions on the bottle.  Oh, the product... Dawn Power Dissolver.  


Ok, the other cleaning bottle that I keep on hand is the Germ-X, or your own favorite hand sanitizer.  As a decorative painter, I keep this on hand for any paint that I get on my clothes.  I do not have to rinse it out right away as I would the Dawn.  Also, hand sanitizer is great for doing a good deep cleaning of my paint brushes.  And, there is that just being able to clean your hands without water.


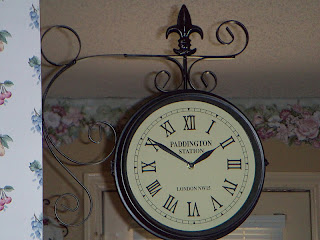
Now, this isn't a product, but a way of living!  Do NOT pay full price for anything unless you just have to.  I have wanted a clock to hang from a side wall between my kitchen and dining area.  Having seen several two sided clocks at flea markets and antique shops, I knew that they were not cheap.  But I am ...  frugal.  I was at Hobby Lobby and there was my clock, $49.99 and it was on sale for half off.  Awesome!  I picked up the last one and proceeded to the check out.  I explained to the clerk that the glass was not attached properly and that the entire thing was going to need to be repaired/glued back into place.  After my additional discount, I think I got the clock for about $21.   So, don't ever be afraid to ask for that additional percent off.  We work hard for our money and it is up to us to make it stretch as far as humanly possible! 


Ok.  That is it for this week.  Next time, I want to show you how to re-purpose those old booster pillows that used to be used on daybeds.  See ya in a couple weeks!  


Saturday, October 15, 2011

Upcoming Craft Shows

Just couldn't wait til Thursday to post this one!  Be sure to stop by one of these shows and introduce yourself.  My followers will be getting 10% off any purchase over $30 in my booth (rounded up to the nearest dollar).  Hope to see you there!!!


Craft/Bazaar Shows in the area that I am showing at -

Thursday, Oct. 20, 12noon-9pm (show is totally booked!) Victory Church at 6301 E. Parker Road, Parker, Tx 75002

Saturday, Oct. 29, 9am-5pm, Sunday, Oct. 30, 11am-5pm (over 10,000 people walk through this show each year!) JJPearce High School at 1600 N.Coit Road, Richardson, Tx 75080

Saturday, Nov. 12, 9am-5pm, Sunday, Nov. 13, 8:45am-3pm. (this show is new to me, but now new!) St. Joseph's Women's Guild at St. Joseph's Catholic Church at 600 South Jupiter Road (Spring Valley & Jupiter) Richardson, TX 75081

 Booth name is One Stroke with Pam.  Be sure to mention that you are one of my blog followers.  - Pam

Monday, October 3, 2011

Painting Seminar with Maureen McNaughton and a Fabulous B&B

Today, I would like to tell you about a fabulous little Bed and Breakfast that four of us stayed in outside of Tyler, "The Stroud House".  As usual, I have a lot of pictures to share with you!  The owners are also going to re-open their restaurant in Henderson called "Blessings".


BED & BREAKFAST
Stroud House
7481 Hwy 64 W
Joinerville, TX
4 mi. West of Henderson
903-847-4241


Above pictures are around the grounds of the Stroud House.  Below, are pictures of a couple of the rooms, dining areas, kitchen, and the restrooms. 


IF you are lucky, you will get to see Sheila's grandson while you are there!


When you go, be sure to tell them that you read about their B&B on my website, most of their advertising is done by word of mouth.  Sheila cooks up homemade scones or a quiche for breakfast, and fresh fruit and coffee too.  When you leave, you feel like you have made a new friend for life!!!  I can't wait to take my husband there for some private little R&R at the B&B !!!


The remainder of the blog will show you pictures from the Society of Decorative Painters chapter in Tyler, where I was blessed enough to get to participate in a seminar with Maureen McNaughton out of Canada.
Special thanks to The Rose Tolers of Tyler!!!!


This is Maureen McNaughton, and these are just a few of her projects that she brought to show us.  IF you are interested in purchasing from/or in taking a class from Maureen-


Below are some pictures of the ladies painting at the seminar.


Now, for the pictures of my friends and my finished paintings from the Seminar.


Mary.


Bev.


Kaye.


Mary, Bev, Maureen, Me, Kaye.


Day 1 Painting.


Day 2 and 3 Painting.

I have heard a lot of things from a lot of my students as they pass through my classes.  One of the most heard statements is "getting together with other ladies is like my therapy, and much cheaper!"  IF you have ever wanted to start a hobby or just do something for yourself, give painting a try.  There are painting groups and teachers world-wide.  Do a search under Society of Decorative Painters for a chapter in your area, or just talk to friends and see if they know of anyone in your area.  If you are in the Dallas/Garland area and wish to give painting a try, drop me a line.  giftofgabsave@hotmail.com
Till next time...